Monday, November 8, 2010

How to Mass Add Army and Guild Members

Introduction

It is very important in Castle Age to build up a large army.  When you add names one at a time it can take you months or even years to reach your 500+ mark.  In addition, you may have already had the experience after adding 2 or 3 names being stopped by Facebook because they think you are spamming.  By mass adding you can add 100+ names in just a couple of minutes with very little effort.  Furthermore, when you are a member of a guild or organization it is vital that you add these members to your army so that you can communicate together during a battle, or be able to fight in a member's battle (Many battles will not allow you to join unless you are a member of the person's army who summoned the battle).  Many organizations such as STOMP have prepared lists of members so that you can mass add the list to first your friends and then your army.  If you are not a member of STOMP you would follow the same directions, but you would use the list provided by your own organization. 

1.  Go to your home page of Facebook and find the name of your organization on the lefthand side of the page.  If you do not see it, click See All and the list of all the organizations you belong to will appear.  When you see the name of your organization, click it and the home page of the organization will appear.  So for those who are members of STOMP you will click STOMP.


2.  Another way you can find your organization is to type the name of the organization in the Search box at the top of Facebook.  So to find the STOMP organization you type in STOMP.  Click the magnifying glass to the right and a list will show of probably matches.  Find your organization and click on it. 


3.  Once you are on the Home page of your organization click on Discussion.


4.  Find the topic that says Mass Adding Members or a title similar to this and click it.


5.  You will see a long list of member names and their email addresses.   You will take your cursor and place it at the top of the list, right click and hold the click down until you drag it over all the names.  When all the names are covered let go of the click.  


6.  Now right click your mouse and a menu will drop down.  Left click Copy on the menu.  You have now saved the list and are ready to paste. 


7.  Now go back to your Facebook home page and click on Account in the upper right corner of the page.  A drop down menu will appear.


8.  Go down the menu and find Edit Friends and click.


9.  On the righthand of the page you will see the words Invite Friends.  Click it.


10.  Two empty boxes will appear.  In the top box that says To: you will paste your email addresses that you copied from your organization.  You do this by placing your cursor inside the top box, right clicking the mouse and choosing Paste from the menu.  You will immediately see the email addresses in the top box.


11.  In the bottom box called Message you will type the words Castle Age and the name of your organization.  In this case, you will type Castle Age - STOMP so the person receiving the invitation will know you are from STOMP.  And finally you click the bottom button Invite and everyone on your list will receive an invitation to be your friend.
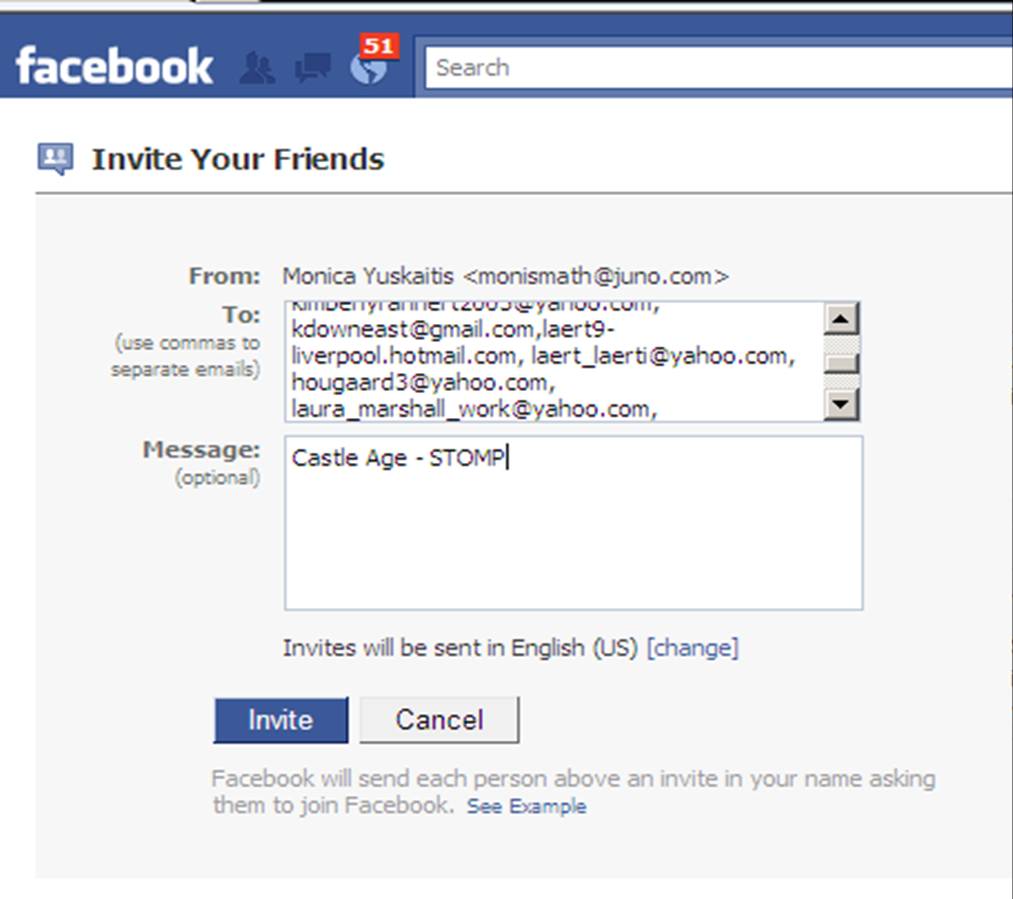

12.  You will know if it worked if a list of friends comes up as on this page.


Wednesday, November 3, 2010

How to Download Skype

Introduction

This may seem like an odd subject to have in Castle Age Tips, but more and more guilds and organizations are using Skype to communicate.  In our guild and organization (STOMP) we use two rooms.  One to just chat and get acquainted and the other is our battle room where we coordinate attacks and defenses when we are at war.  Below are the steps for downloading Skype.

1.  Open up your Internet Browser.  You do this by clicking on your Internet browser icon either on your desktop or in the main menu of the computer.


2.  Type in the Skype webstie in the URL address box.  The address:    http://www.skype.com/


3.  Click the arrow to the right of the URL box and the home page of Skype will come up.  Look for a white with blue letter sign that says Join Skype in the upper right hand corner of the screen.  Click it.


4.  A form will come up for you to fill in that says Create an account or sign in.  Fill in the boxes with your personal information.  Use your Facebook name for your name, and your Castle Age name for your Skype name and make sure you write down all of this information.   You many have to add numbers to some of your names to make them more secure.  Skype will prompt you on this.


5.  Read the Skype terms of service, fill in the squiggle words, and click that you agree and continue.


6.  When you click the green box (I agree - Continue) a screen will come up that looks like you have to repeat the whole process.  Do not fill everything out again.  Look for the words in the little box that say Sign In.  Click that box. 


7.  Type in your Skype name and password and click Sign Me In.


8.  A screen will come up that says your download is in progress.  Sometimes your computer's security will stop you at this point.  If it does, click the bar just under the menu bars that allows you to run this new program.  Next a box will appear over that screen that asks you if you want to run or save this file?  Click Run.  Then you will need to wait a few minutes while the Skype set-up program downloads.


9.  When it is finished downloading a Hello screen will appear with a link to the Skype End User License Agreement.  Click to read, return to the Hello screen, and click the "I Agree - Install".


10.  Click Continue installing Skype on the next screen.  Downloading the toolbar is not necessary.  Wait while the Skype program downloads.


11.  One more screen will appear that says you have downloaded Skype.  At that point click the button at the bottom that says Finish.


12.  A screen will come up for you to register a second person.  Do not fill it out again, instead click sign-in.


13.  At this point everything is installed and ready to go.  Type in your Skype name and your password and then click Sign In at the bottom.


14.  Your Skype home page will show up.  On the left select Add a Contact.  Enter denise.sylva924 in the Skype Name box, and then click +Add.   Click the View button to view all the matches found..  When you locate the correct contact, click Add Contact next to their name.  This sends a contact request to Denise.  After she has accepted your contact request, she will add your name to the STOMP room and the STOMP2 room which is the battle room.  When that is done, you can send instant messages to each other.  The STOMP1 room is for getting acquainted with other STOMP members.  The STOMP2 room is where we coordinate the battle strategies during a guild battle.


Monday, October 25, 2010

How to Increase Your Income in Castle Age

Having a lot of gold in Castle Age can make you very strong because you can buy the equipment and personnel you need to be successful.  I have put together some information and tips that will help you to maximize your income and make you a wealthy Castle Age player.

1. Deposit your gold. 

Each hour you will receive a gold payment.  The amount you receive depends on your level.  As you battle and perform certain activities in Castle Age you will earn additional payments of gold.  When you recieve this gold, deposit it in your Treasury under the Keep tab to protect it from attackers.


2.  Never let your gold build up. 

Buy land just as soon as you have enough for a new property.  Under the Town and under the Land tab you will see the maximum number of pieces of land that you can purchase.  Make sure you have purchased the maximum for each property.


3.  Buy the smallest pieces of land first and build up gradually to the larger pieces. 

Never buy less than 10 properties at a time.  The cost goes up each time you buy, so the more you can buy at one time, the more money you will save.


4.  Use generals to help you increase your daily income.

At Level 4 and when equipped Cid will give you 4% more income.  This means that you must choose him and he must be in position at the top right corner when the gold comes in. 


At Level 4 and when equpped Mercedes will give you 5% more income.


At Level 4 and when equipped Scarlett will give you 6% more income.


5.  Use a general when depositing.

At Level 4 and when equipped, Aeris will wave the 10% fee when you deposit your gold into the treasury.  This means that you must choose her and she must be in position at the top right corner when you deposit your gold.  For example, when you normally deposit 100,000, after the fee, you really only deposit 90,000.  With Aeris in place, you get to deposit the full 100,000.


6.  Use generals when purchasing soldiers.

At Level 4 and when equipped Penelope will give you a 4% discount when purchasing soldiers.  This means that you must choose her and she must be in position at the top right corner when you buy your soldiers.


At Level 4 and when equipped Garlan will give you a 6% discount when purchasing soldiers.


At Level 4 and when equipped Lucius will give you an 8% discount when purchasing soldiers.


At Level 4 and when equipped Darius will give you a 10% discount when purchasing soldiers.


7.  Use a general for questing. 

At Level 4 and when equipped Strider will give you a 2000 gold bonus when questing.


Monday, September 27, 2010

How to Join and Fight in Guild Battles

Introduction

The purpose of the Guild Battles is to test your guild's strength against another guild.  It is a fun, non-threatening battle because you get to choose who you will duel.  The investment is only 20 Stamina points for the entire battle.  Once you pay you can duel as many players as you like as long as your Health and Tokens (10 to start with, and another every 6 minutes) hold out.  At the end of the battle you usually get your 20 Stamina points back if not more.  The battle lasts 5 hours and you can come in and out as you please during that time.  Below is a step by step procedure on how to enter and play:

Step 1 - Open up your Castle Age and click on your Keep tab.


Step 2 - Scroll down to your Guild information and click the button that says View.


Step 3 - Find the tab that says Guild Battles and click on it.


Step 4 - You will see the battles that have been started by your Guild officers.  Pick one and click Engage.  (These 2 battles have already ended so where it would normally read Engage it says Collect Reward.)


Step 5 - Click on the words Enter Battle (20 Stamina).  This means at this point you need to have 20 Stamina to get in.  Don't worry you will get that back at the end of the battle and maybe even more.


Step 6 - The first thing you will see is your name and statistics for the battle.   In the upper lefthand corner you will see how much time is left in the battle in red.  In the upper righthand  corner you will see who you are fighting in blue.  Down in the lefthand corner you will see your name, level, the class you are fighting as (Warrior, Cleric, Mage or Rogue), Health (your total Health from Keep), status in the battle (healthy, good, fair, weakened, stunned) and your Battle Activity Points (the points you earn during the battle).  The red bar will go down as you fight.  It shows how much Health you have left.  When it hits the bottom, you cannot fight anymore.  In the bottom righthand corner you will see a flame inside a green oval.  Next to it is the number of Tokens you have.  You start out with 10, and it takes 1 Token every time you fight.  You can get a new Token every 6 minutes.  If you have no Tokens left, you cannot fight.  You must wait for more Tokens before you can fight again.


Step 7 - As you scroll down you will see your Guild (green) and the enemy's Guild (blue).  The colored bars show who is currently winning in the battle.  As you go down you will see 2 tabs:  Enemy Guild and Your Guild.  Make sure you pick the Enemy Guild if it is not already chosen.  Under the tabs you will see 4 gates.  Your opponents are behind the gates.  You can open up any gate to duel.  I would recommend that you look in each gate to find people to battle a little below your own level.  Once you look them over, you can decide which gate you will start with and who you will fight first.


Step 8 - As you open a gate you will see your opponents and their levels.  Look at several things before you choose one to battle:  their level (try to pick just below your own level), their health (It has to be higher than 0.), their status (Do not pick anyone who has the status Stunned.  They can no longer fight.)  In this picture you can see all the opponents are Stunned.  Therefore, you want to scroll down to find some opponents that are not in that condition. 


Step 9 - After scrolling down you can find someone you can duel.  At that point you hit Duel and a scoreboard will show up.  In this case I chose to duel with Robert.


Step 10 - Here is the scoreboard after you duel.  At the top it will tell you if it was a victory or defeat.  Then your stats are listed under your name and those of your opponent under his.  When you roll the cursor over the little pictures of the equipment, you can see the names of the equipment your opponent has.  This is a very good thing to study when you lose.  You can see what they have that might be better than what you have.  Then you can set some goals to get those pieces of equipment.  Next, it tells you the damage that you took and that of your opponent.  The green word Gain tells you the guild battle points you earned, and the green word Cost tells you what it cost you to fight this battle.  At this point, you can duel the same opponent again or go fight another opponent.  You can continue this until you run out of health or tokens.  Tokens can be replaced (1 every 6 minutes), health cannot.  Although, clerics in the same gate that have a lot of health have the capability of healing you.  More on this later.